
Unsigned documents are not published as part of the medical record, nor are they available to other staff. All documents and forms should be signed. There are multiple methods to locate documents and forms that have not been signed. The following is in order of the recommended sequence of searching for saved documents.
- My Portal -Saved Documents
- Analytics - Saved Documents
- Notification Toolbar and Message Centre
- Analytics - Unsigned
- ContinuousDoc
1. My Portal
-
Click
 in the toolbar. If the icon is not in view, see Customise PowerChart Toolbars quickstart
 -
Click My Saved Documents
-
Documents can be sorted/alphabetised by headers by clicking the arrow at the top of a column
-
To complete/sign your note or form, click the Complete & Sign Note/ Form hyperlink in the Click to edit/Sign column

- The note or form opens in edit mode and can be edited/completed
- Sign by clicking Sign/Submit or the green tick
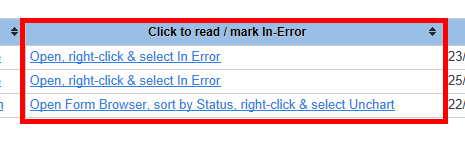
- If the Saved document is no longer required because it is irrelevant or superseded by another document, click the link under “Click to read / mark In-Error”
-
If the document originated from a Note, right-click on the document and select In Error
-
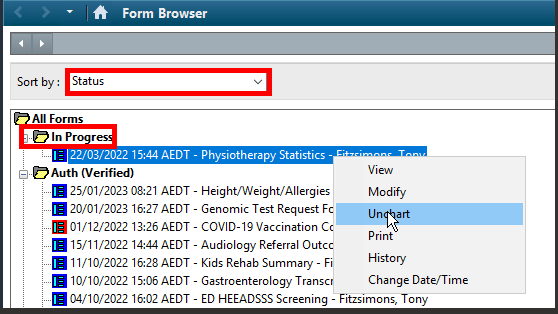
If the document originated from a Form, Form Browser will open
-
Sort the forms by Status using the drop down at the top
-
Unsaved forms will appear in the section labelled In Progress
-
Right-Click the form and select Unchart
-
Note if your form was charted more than a few years ago you may have to change the date range in the grey bar to locate it
-
2. Analytics - Saved Documents
-
Click
 in the toolbar
 -
Locate the Saved Documents component (usually bottom right of the screen)
-
Click the note to open
-
Sign

3. Notification Toolbar and Message Centre
-
The number of unsigned notes a user has appears on the Notification Toolbar (with the Gold Key), labelled SavDoc
-
However, this does not include all document types and after a period of time, documents drop off the list

-
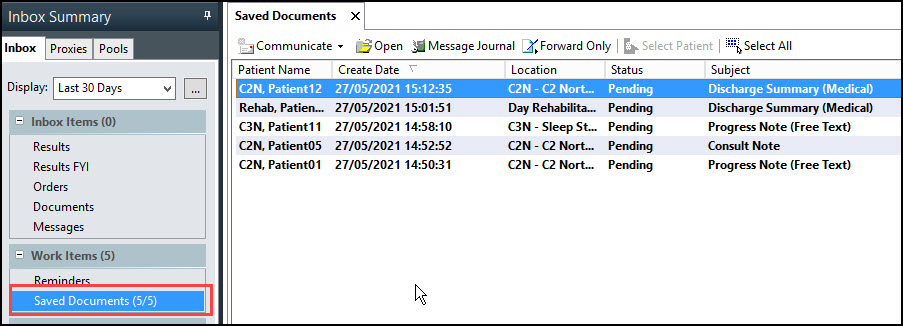
Click SavDoc to go directly to Saved Documents in the Message Centre
-
Double click a patient line to open the document
-
Various activity icons are available at the top of the screen. Hover to view their function
![]()
-
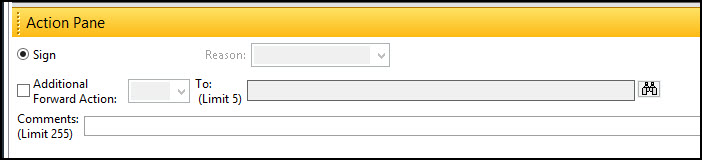
To view the Action List: Drag the bar above the Action Pane upwards
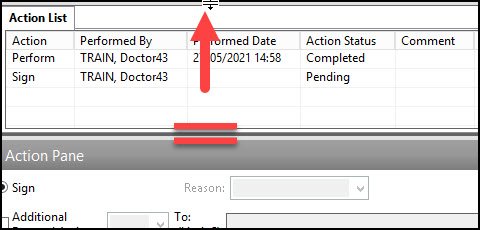
- Use the Action Pane to Sign and/or forward for Review or Signature
-
Click OK & Close or OK & Next

4. Analytics - Unsigned
-
Analytics will display unsigned documents at a ward level (current inpatients only). You will only be able to sign notes you have started from this component
-
Click
in the toolbar -
Locate the Unsigned component
-
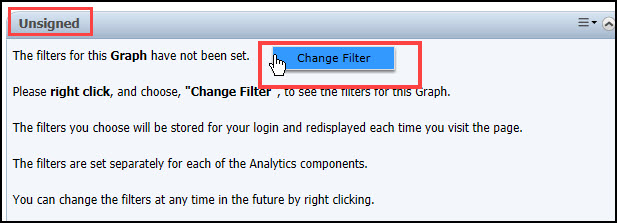
Set the filter by right clicking anywhere in the box and clicking Change Filter
-
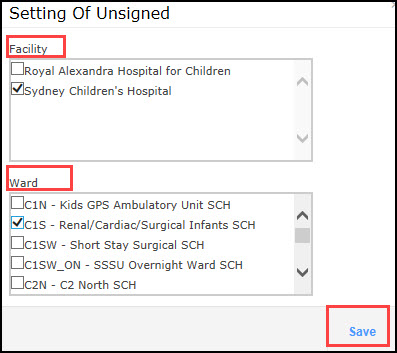
Select the Facility and Ward
-
Click Save
-
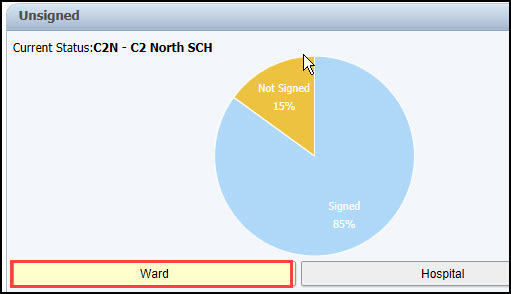
A pie graph will display the proportions of Not Signed and Signed documents for all users in the ward
-
Click the Not Signed portion to view a list of unsigned documents and forms for the current inpatients on the ward
- Use the Search field to locate your own documents
- Click a patient line to open the document
5. ContinuousDoc
-
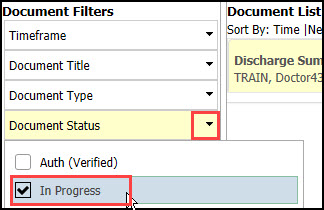
ContinuousDoc will list unsigned documents for a patient. The document status will be In Progress and no text will display

-
Filter to show only In Progress documents using the Document Status filter
- Double click over Document Detail to open:
- Unsigned documents will have a header * Preliminary Report *
-
Unsigned forms will only show results from form fields. Complete and Sign in Form Browser
Modify and Sign Unsigned Documents in Analytics or ContinuousDoc
-
Use the icons at the top of the window or right-click and select an action. Make sure to Sign after Modify or In Error
-
Settings are:
![]() Sign
Sign
![]() Modify: associated providers only (your own or if it was forwarded to you)
Modify: associated providers only (your own or if it was forwarded to you)
![]() In Error: your own documents only
In Error: your own documents only
Note: Forms must be signed via Form Browser or via Analytics component – they cannot be completed via ContinuousDoc.